Do you want to add more storage to your Asus ROG Ally or Ally X quickly, affordably, and easily? Get a microSD card, slide it in, and get back to gaming. But where’s the fun in that? If you want faster storage that doesn’t cost much more than a high-capacity microSD card, we suggest upgrading its M.2 SSD.
Now, taking apart your expensive piece of hardware can be intimidating, but with our step-by-step tutorial, which includes the necessary tools and components, we’ll get you and your ROG Ally to the finish line in no time. And, in case you haven’t already customized your ROG Ally, we’ve got a number of must-have ROG Ally accessories we think you’ll like.
Get your tools ready
Most of the tools you’ll need for this project, like spudgers and a #0 Phillips-head screwdriver, are easy enough to get piecemeal online or at your local hardware store. But if you want a tidier solution that contains everything you need in one place for dismantling the ROG Ally (and just about any other consumer gadget in your home), you might want to consider the Essential Electronics Toolkit from iFixit. For the purposes of this tutorial, I’m relying on my trusty Pro Tech Toolkit, which costs more as it contains additional pieces.
Buy a new SSD
As for your replacement SSD, you’ve got plenty of options. But which one you should get depends on how much storage you’ll need, and which ROG Ally you have. If you’re working with the original white ROG Ally, which features a 512 GB SSD by default, we suggest doubling the internal storage with a 1 TB SSD, or quadrupling it to 2 TB if you can afford it. One spec that’s crucial to know is that the standard ROG Ally can only accommodate the 2230 size of M.2 SSDs.
If you own the newer black ROG Ally X, which is equipped with a 1 TB SSD out of the box, you’ll probably want something with 2 TB of storage. However, because this handheld is only compatible with the larger 2280 size of M.2 SSDs, there’s a wider range of options at multiple price points. Note: Some Ally X owners on Reddit report that there’s adequate internal space for an M.2 SSD that has a built-in heatsink, though some owners note that not using one doesn’t seem to impact performance.
Before we continue on with installation instructions, we’ve pulled together a handful of compatible models for the ROG Ally you can choose from, followed by recommendations for the Ally X.
2230-size SSDs for the ROG Ally
2280-size SSDs for the ROG Ally X
Begin the disassembly — carefully

A general rule before opening any device is to first power it down. Not just that: Draining the battery is never a bad idea during this process. Asus recommends discharging the battery to around 25% before operating on the ROG Ally, as a charged battery is a potential fire hazard if something goes wrong.
Next, remove your microSD card from the slot. Doing so will minimize the chance of accidentally breaking it (I say this because, unfortunately, it has happened to me).
Lay the console face down on a table, or use any level surface that’s free of debris, ideally one like the anti-static silicone pad I’m using in the photos.
To access the internals of the ROG Ally, you’ll need to use a Phillips #0 screwdriver to remove five screws. Note that a sixth screw in the bottom center of the handheld is designed to be loosened, but not removed, so don’t persist.
Once the screws are removed (again, save for the bottom middle one), slide a soft flat edge (like a guitar pick, prying tool, or plastic card) gently between the plastic housing to loosen the clips around the edge of the back cover. You’ll know you’ve done this correctly when you hear them click and the back cover begins to separate from the chassis. Carefully lift the back cover away and place it somewhere safe.
Disconnect the battery
Before doing anything else, you need to disconnect the battery. The instructions are the same for both the ROG Ally and ROG Ally X, even though internally they look a bit different. To do this, simply use the flat edge of a plastic tool to carefully push the metal locking bar away from the connector that’s holding the ribbon cable in place. It’s important that you do not attempt to lift the bar, as this may damage it and prevent it from locking back in place.
Once the locking bar has been pushed back, use a flat tool underneath the connector and gently lift the cable away from the socket. This shouldn’t take much effort. Once you’ve disconnected the cable from the motherboard, you no longer need to worry about the battery.
Remove the plastic cover shielding the SSD
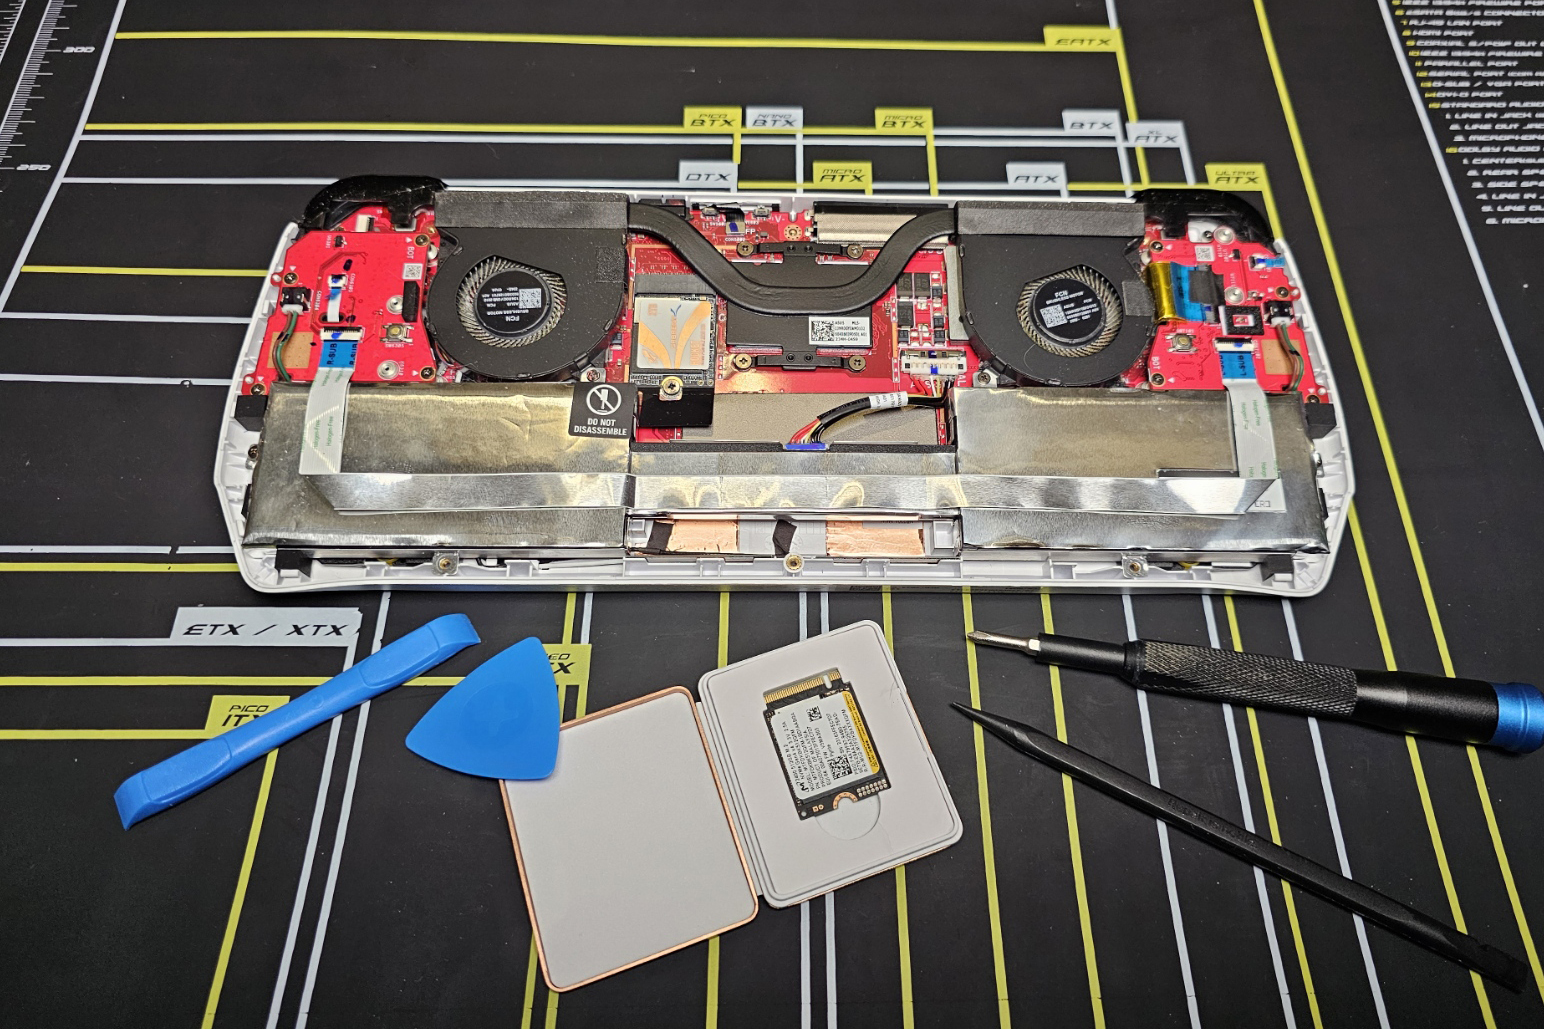
Once you’re presented with the internals of the ROG Ally, you’ll see a sheet of plastic covering the SSD. This is attached with a small bit of adhesive, letting you easily pull it off. You might want to hang on to it instead of immediately throwing it in the trash, like I did. In the ROG Ally X, the SSD itself is covered with a thermal cover that you definitely shouldn’t throw away.

Remove the SSD
It’s time for the main event. Underneath the black sheet of plastic, the original SSD that came with your device will be visible next to the fan on the left side of the Ally (in the ROG Ally X, the rectangular 2280-size SSD is located in the middle of the device, oriented horizontally underneath the battery cable and a removable thermal covering). Using a Phillips #0 screwdriver, remove the single screw that secures the SSD in the M.2 socket. The SSD should lift up a bit, and you can then gently pull the SSD out of its socket. Do not attempt to lift the SSD up as you remove it, as this has the potential to damage your handheld and/or your SSD.
Set aside the old SSD, which you can reformat to use as you please.
Install your new SSD
At this point, you can seat your shiny new SSD in the now-vacant socket. Match the SSD’s pins with the socket, and then gently insert it without much pressure. You’ll know that you’ve done it correctly once the small indentation on the SSD’s bottom lines up with the hole for the screw you removed earlier. Screw it back in. You’re nearly finished!
Reassemble your device
Putting your ROG Ally back together means doing everything you just did to disassemble it, but in reverse.
To reconnect the battery, take the connector of the ribbon cable and reseat it in the socket. You can use your fingers or a soft tool to gently push it down into the socket until you hear a small click. Afterwards, use your flat edge to push the locking bar back into place over the connector.
If you held on to that small plastic sheet you removed earlier, you can stick it back into place. However, if you were like me and hastily discarded it, don’t worry; it won’t hamper the performance of your Ally.
Finally, you can reattach the back cover. Simply press the cover back into its original position until you hear the clips start snapping into place. If the back cover is still a little loose, that’s OK. Once you tighten all of the screws you removed earlier, it will be secured into its original position.
Perform a cloud recovery
The final step to getting your Ally game-ready is to restore the Windows operating system. To do this, plug the Ally back in and power it on. It should boot into the BIOS menu automatically. If it doesn’t, try powering on the system while holding down the power and volume-down buttons simultaneously.
Once you’re in the BIOS menu, use the touchscreen to navigate to the Advanced tab and select Asus Cloud Recovery. From there, you should be able to follow the prompts to download and reinstall the OS. While you’ll need to redownload and reinstall any games you had stored on the original SSD, you’re otherwise good to go. Good luck, and have fun.
Source:https://www.polygon.com/gaming/506956/how-to-install-m2-ssd-asus-rog-ally-x


